Tuesday, April 19, 2016

Cute DIY Whiteboards


What You'll Need:
  • Picture frame. I had this one in my closet but thrift store frames are always available at a minimal cost.
  • Paper. I decided to use my favorite wrapping paper but any paper will work; cards, construction paper, printer paper, scrapbook paper, etc. 
  • Writing utensils.  You'll need a pencil (with an eraser), and marker. 
  • Cutting tool.  I prefer an x-acto knife for projects like this but scissors will work well also. 
  • Stencils. Letter stencils are useful if, like me, you are not confident with your handwriting. You can also use letter stickers to make the project go a little quicker. 
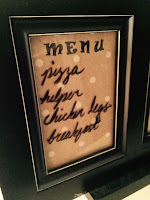
How To Do It:
Step 1: Choose It- Choose a frame perfect for your needs. I needed three small white boards and
lucked out that I had this frame sitting in my closet. This project is totally scalable. Get creative with your paper too. 

Step 2: Cut It- Take the front glass out of the frame and put it on your paper. Place that on top of cardboard or foam so you don't damage your work surface. Hold the glass down and use your X-acto Knife to trace the exact dimension you need. 


Step 3: Measure It- Put the paper back in the opening with the glass behind it. Trace lightly, in pencil, the exact space of the opening so you know what space you have to work with. 

Step 4: Trace It- Trace a straight line in pencil in your usable space for your title (if you are doing a title.) Then trace your stencils lightly, also in pencil, to make sure your design works. This may take a few tries. 

Step 5: Mark It- Use a fine point marker, my favorite is a Sharpie Fine Point Pen, to fill in the letters. Again, you can use stickers for this to save time but it will cost a little more. 

Step 6: Erase It- Once you have your letters filled in, erase all the pencil lines you can see. This will contribute to a polished finished product. 


Step 7: Display It-  I hope you put your cute, custom white board to good use :) 


Monday, April 18, 2016

Dress Up Your Dresser - on a budget


When I married my husband, we were blessed with one four-drawer dresser he had owned since childhood that was missing most of its hardware and had moisture rings all over the top. We didn't have the budget or space to upgrade. So we did what we do best and made what we already had perfect for us.

 
Here's what you need for a simple dresser upgrade:
Paint- we used eggshell finish latex paint and our dresser required less than a quart.
Sandpaper- because of all the flat surfaces, this is a great project for a belt sander or palm sander but if you don't have either of those, any sand paper (I prefer 150 grit) and a little elbow grease will do the trick.
Paint Brush- the best kind of brush is a high quality latex bristle brush, this will make the project much easier.
Hardware- get whatever handles make you happy, that fit the measurements of the holes made for the previous hardware (we didn't measure and got the wrong hardware at first)


Step 1: Sand It- Take the drawers out and sand the finish from all the surfaces.

Step 2: Dust It- Make sure to remove all the dust before you start painting or they will show up in your finished project.

Step 3: Tape It- This project doesn't need a ton of tape prep work. The only place we found should be taped is the inside of the drawers behind the hardware openings.

Step 4: Paint It- Do a light first coat on the drawer faces, and exterior of the dresser. Use long brush strokes from end to end with the grain just to lightly cover the surface. Using long brush strokes is vital to avoid marks in the finished project. Allow the first coat to dry completely before applying the second coat or it could remove some of the first coat. Apply a generous amount for the second coat; again using long brush strokes from end to end with the grain.

Step 5: Complete It- Allow it to dry before you add hardware. Then allow it to cure (required cure time can be found on the label) before reassembling.

Enjoy your new-to-you dresser :) 

Sunday, April 17, 2016

Mason Jar Budgeting

Intro
I don't know about you but budgeting has always been a difficulty for me and my husband. We would enter every new budget scheme with enthusiasm but would eventually fail. So we decided to go with the envelopes of cash method. But quickly found it was still too easy to splurge with envelopes of cash with us. So we thought we could do the cash method with something more difficult to carry in a purse or wallet. Enter jars. Everyone has a jar or something full of change right? So why not apply jars for budgeting?


The System
We didn't do jars for everything; just for the things we often splurge on. As a hair stylist, I had to add a jar for hair products which most people probably don't need. We already went grocery shopping every Sunday and decided to make that our cash withdrawal day. Every week we pull $20 for date night/eating out, $20 for gifts, $80 for groceries, $40 for everything else 'other' and $10 of 'fun money' for each of us per week.  This will just add up over time so sometimes we won't have a date night for a few weeks and then can splurge on an $80 date or buy steak if we have a few under budget grocery bills in a row. Tithe, rent, other consistent bills, and gas all still just come out of our checking account at their regular times. This will hopefully allow us to stick to our budget completely and continue to build up savings for the next phase of life.

The Project
This was a super simple and fun weekend project. We spent $0 on the entire thing :)

Step 1: Find Jars- We happened to have quite a few jars lying around but you can find jars pretty easily at any thrift store, dollar stores, and grocery stores. It wouldn't even need to be matching jars and could add to the art of the project if they were all different.

Step 2: Paint- Since these jars will be full of cash, we thought it best if they weren't clear. We happened to have some left-over latex paint from another project that we used and it worked well, but any kind of paint will work. Just put 6 or so spoonfuls of paint into the jar, roll it around so the paint covers the inside of the jar, pour out the excess, and allow to dry in a warm, dry place. If you have paint leftover from a bunch of projects, you could do several colors and make a super fun piece. This is also a fun thing to do with a boring glass vase.

Step 3: Label- We also had these cute label stickers so just made use of them. You could use chalk markers, permanent markers, or label stickers to do your jars. I've seen these used for herb gardens as well and it was oober cute.

Step 4: Display- We chose to hang ours but they would be super cute even just on a shelf. We used twine with a slip knot around the rim of the jar to be able to remove it easily. We also decided to hang it in our bedroom where we can have a reminder of our plan but without having jars of cash out for guests to see. And we put a reminder of what is truly important right there with them.